Web Service Security
The following document contains a brief explanation about Web Services that will be used by the application to manage data transactions among backend and client-end.
See this table to see the header requirements of each process request:
| Process | Content-Type | Authorization | Accept | Signature |
|---|---|---|---|---|
| Request Token | ||||
| Inquiry | ||||
| Checkout | ||||
| Get Order Detail | ||||
| Get Product List | ||||
| Get Deposit Balance |
Header Detail
| Parameter | Value | Description |
|---|---|---|
| Content-Type | application/json | |
| Authorization | Bearer token | See section 2.3 to get the token |
| Accept | application/json | |
| Signature | Digital signature with PSS or PKCS mode | Mandatory for checkout request. See section 2.4 for detail |
| Date | Current timestamps with format RFC1123 | See section 2.5 for detail |
Domain Detail
| Environment | Value |
|---|---|
| Sandbox | https://b2b-playground.tokopedia.com/api |
| Production | https://b2b.tokopedia.com/api |
Token Generation
Flow
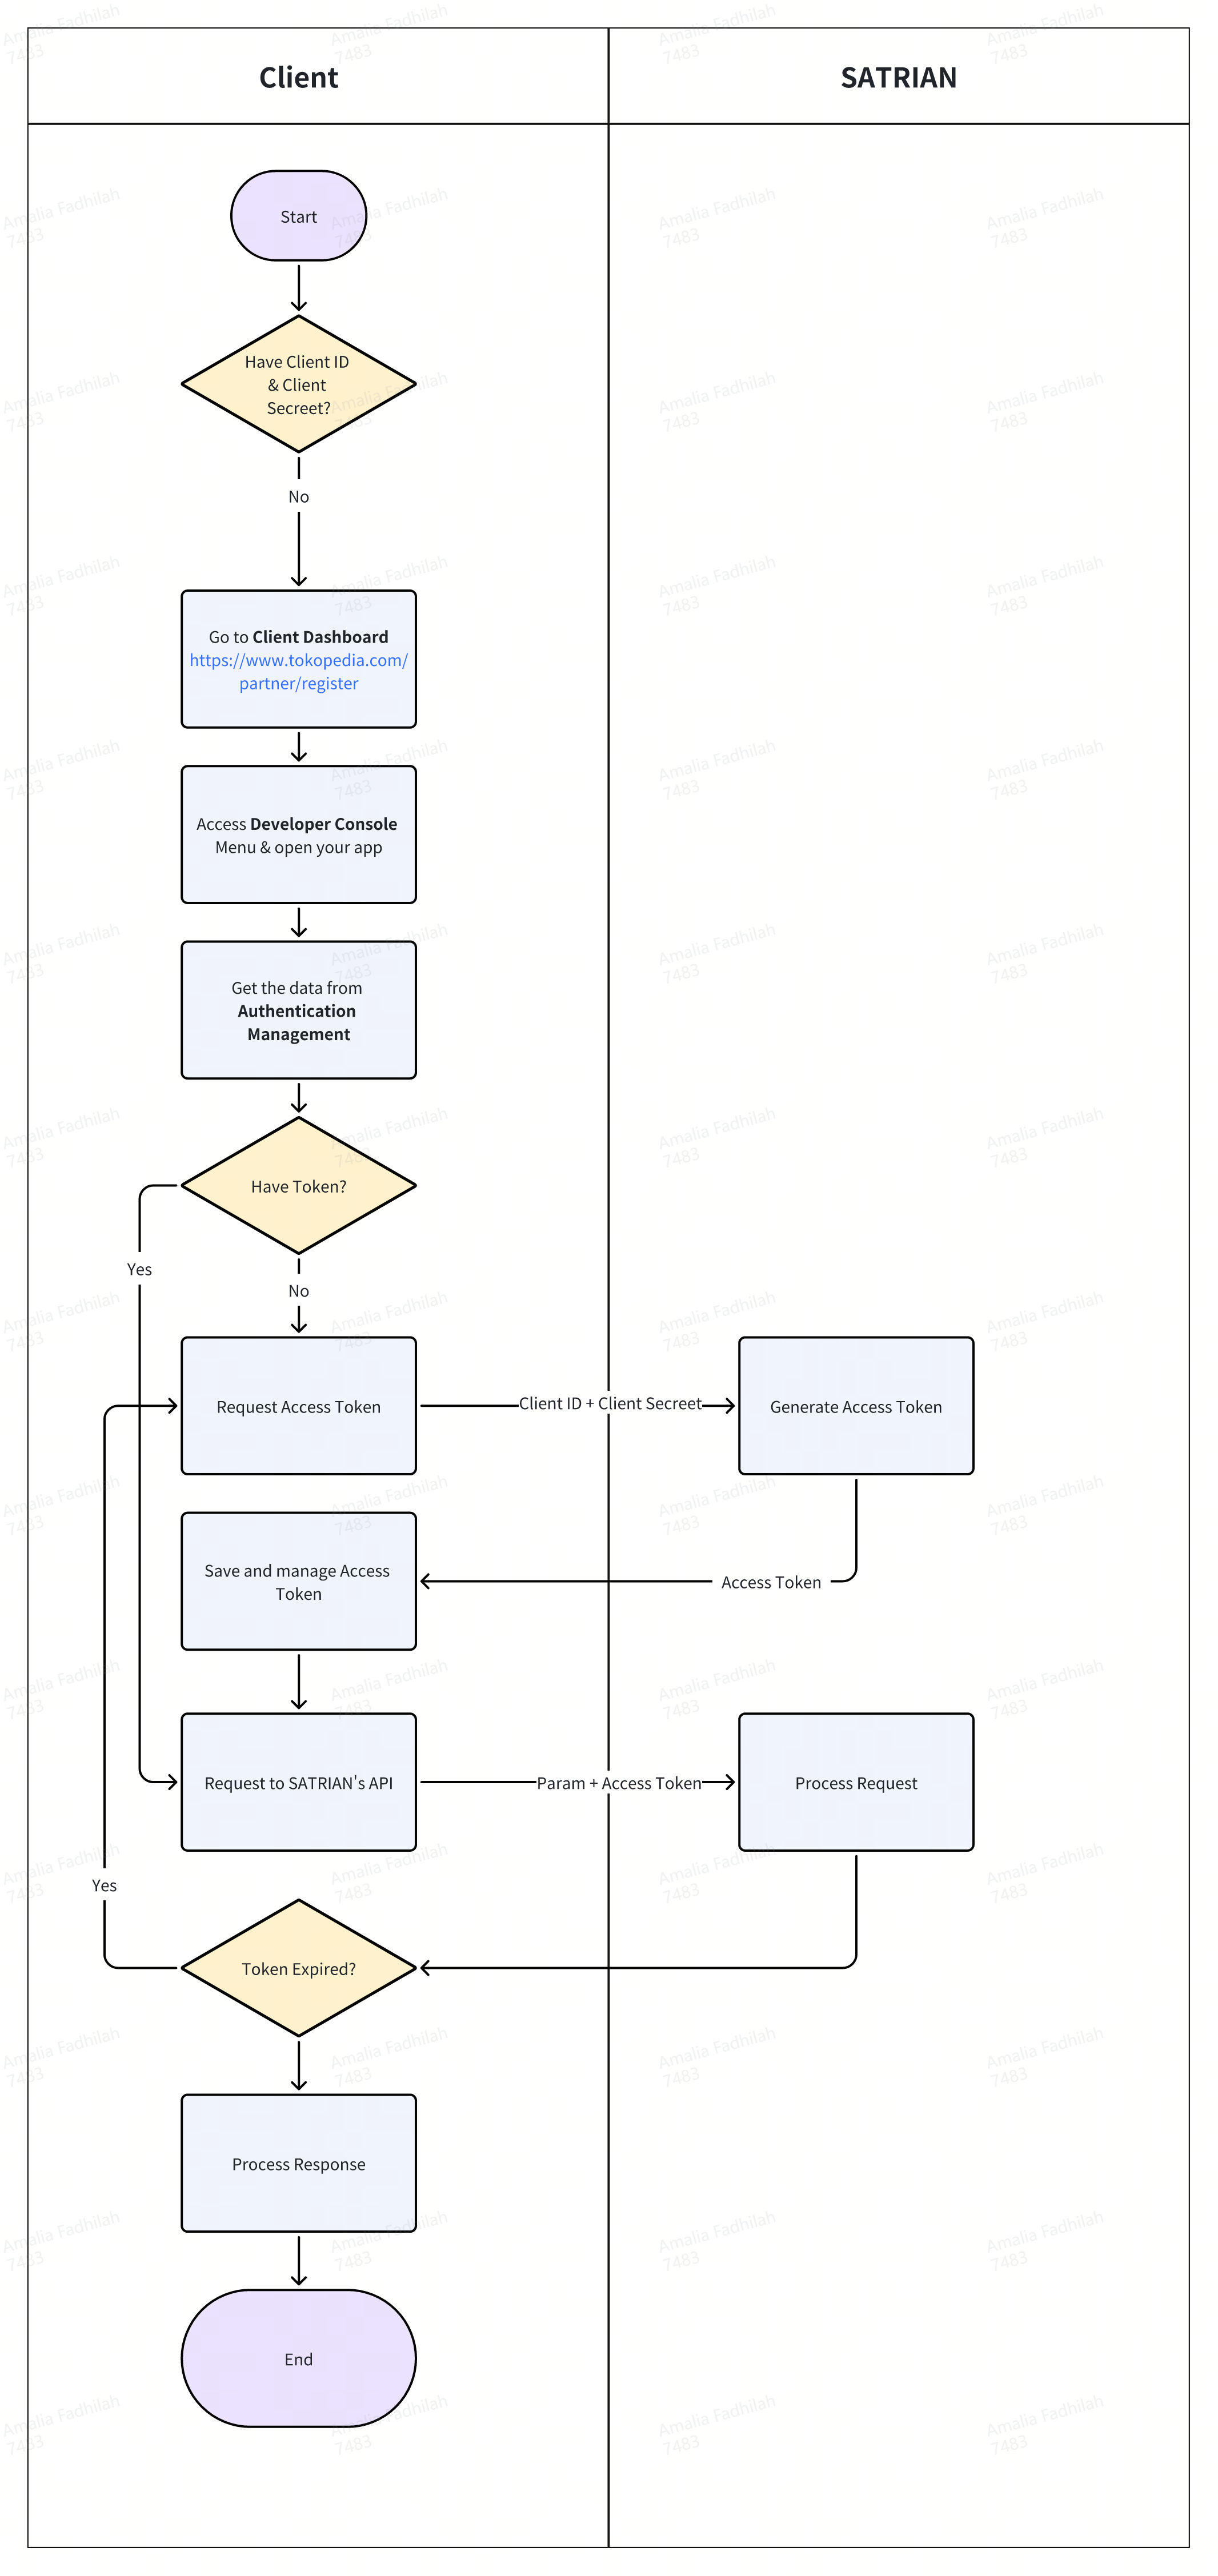
ClientID and Client Secret: this will act as your username and password. Please keep this confidential as this will identify your company’s identity.
Access Token: this will be required for every request you made to SATRIAN’s API for transaction purposes
This flow works only for API Version 2
Steps:
Get client_id and client_secret
Get access token
Request to SATRIAN’s API with the access token
How to get ClientID and Client Secret?
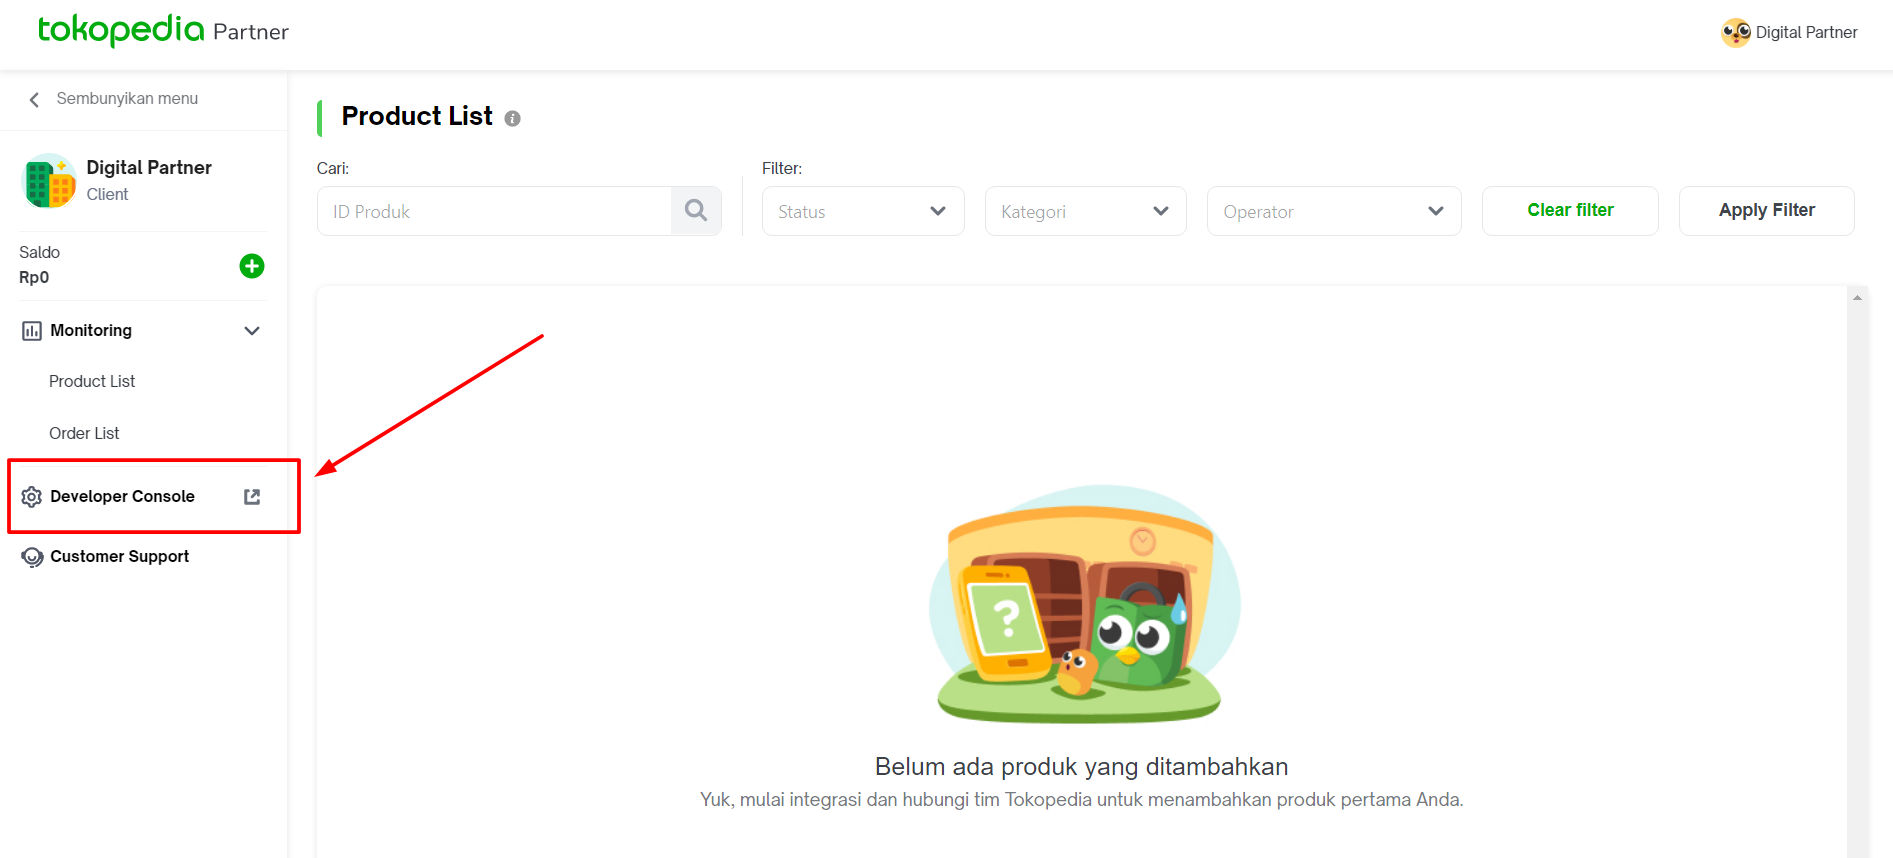
Ensure that you already have your company credential. If you don’t have it, please register your company through Tokopedia Digital Solution. Then, ask the SATRIAN representative to approve your submission. Once approved, you can access Developer Console via the client dashboard menu.
After being redirected to the developer console, you can see 2 apps generated on that page. Please access and manage it for development purposes.
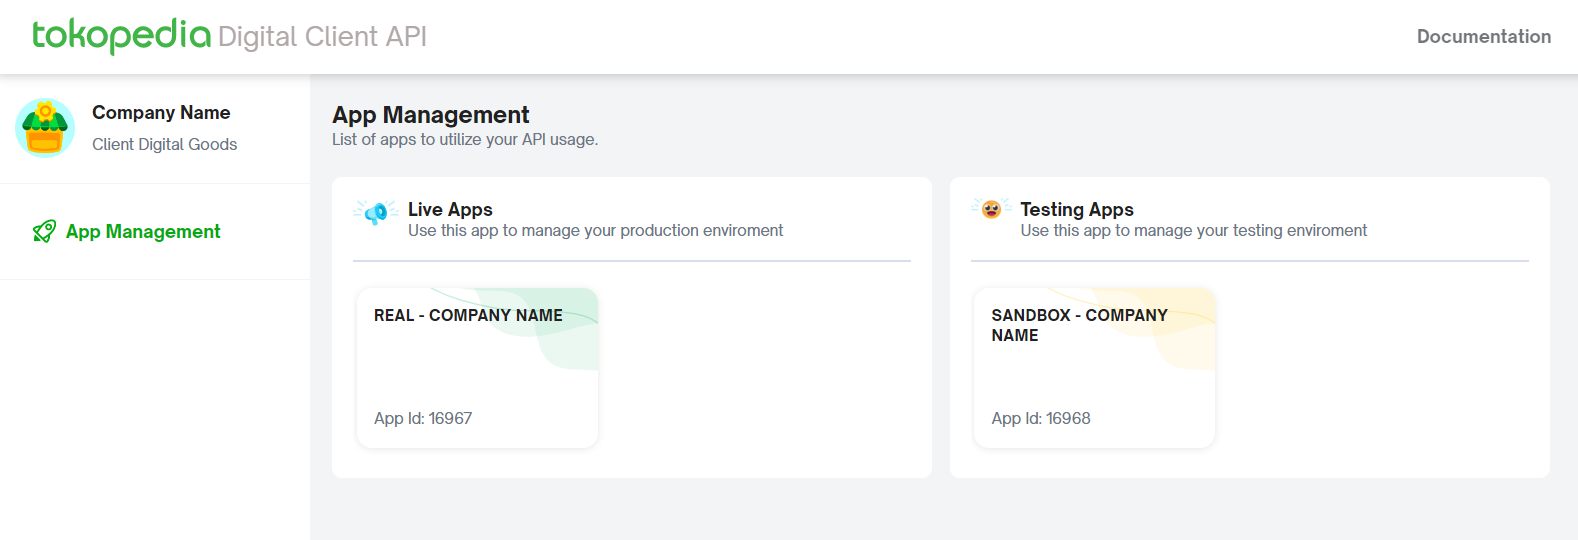
Live App (Real/Production) Manage your production environment so you can connect to our production API endpoint https://b2b.tokopedia.com/api.
Testing App (Sandbox) Manage your testing environment so you can connect to our testing API endpoint https://b2b-playground.tokopedia.com/api.
*If you don’t see these 2 apps on your dev console, please inform our team for support.
Then, choose the application suitable to your testing purpose whether for testing in Sandbox (Playground) or Production. Please go to “Authentication Management” at the top left menu. You will see the client_id and client_secret that you can use for the integration.
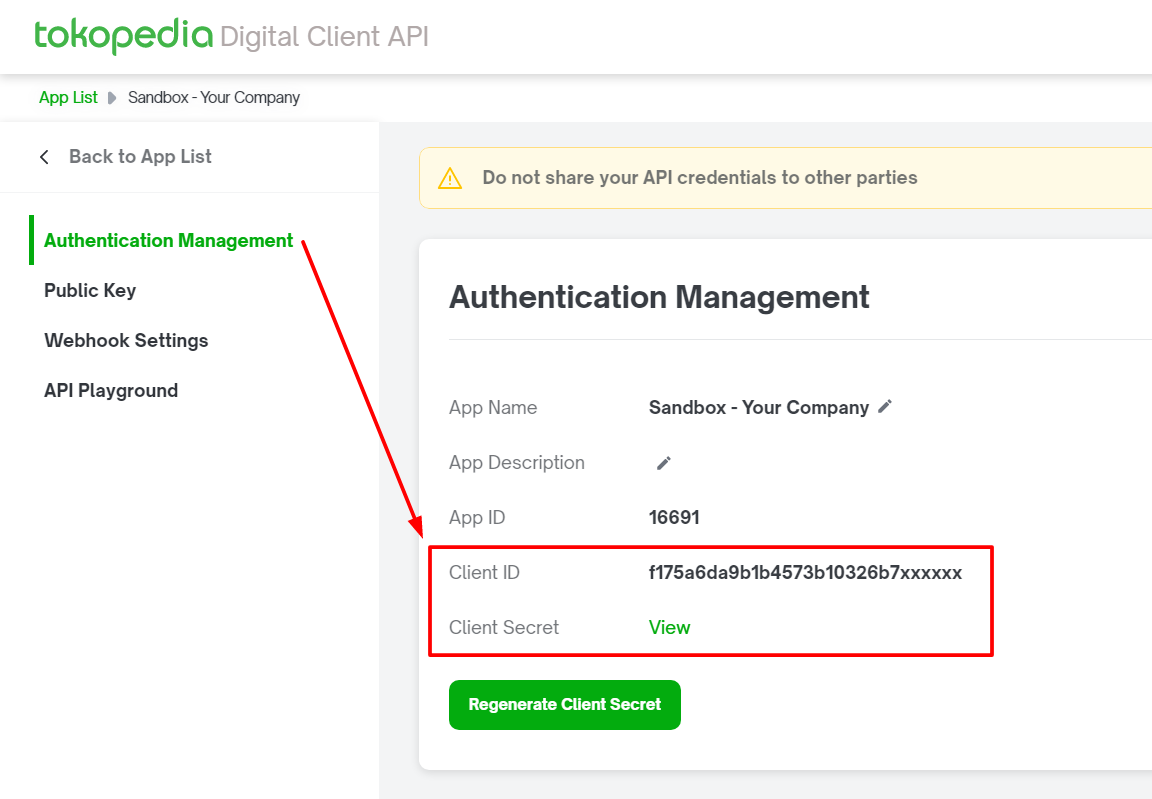
You can regenerate the client secret if needed. Please continue to manage and complete your environment setting on both testing and production app.
How to get Access Token?
Requirements:
Client ID
Client Secret
Whitelisted IP of your production server to hit our production server
Steps:
Encode your client id and client secret to base64 with format: client_id:client_secret.For sandbox, please use the client id and secret from Testing App. While for production (live) please use the client id and secret from Live App
Make a POST request to https://accounts.tokopedia.com/token?grant_type=client_credentials and use the base64 encoded credentials string from step 1. Put it on the request header. The same endpoint is used both in the sandbox and production environment.
Example:
curl -X POST
'https://accounts.tokopedia.com/token?grant_type=client_credentials'
-H 'Authorization: Basic Y2xpZW50X2lkOmNsaWVudF9zZWNyZXQK'
-H 'Content-Length: 0'
-H 'User-Agent: PostmanRuntime/7.17.1'
3. If successful, you will get the response like below:
{
  "access_token": "LSPr7x7sRGaewzwZE6IcuA",
  "expires_in": 2592000,
  "token_type": "Bearer"
}
4.You can use the access token to make a request to SATRIAN’s API like the following example:
curl -X GET
'https://b2b.tokopedia.com/api/v2/sample/endpoint'
-H 'Authorization: Bearer LSPr7x7sRGaewzwZE6IcuA'
for detail, you can read the documentation here: https://developer.tokopedia.com/openapi/guide/guides/authentication
Digital Signature
SATRIAN uses Digital Signature for financial transaction requests to ensure the communication between both parties are not altered or tampered and prove the authenticity of the request. This way will increase our security to prevent fraud and loss.
Why do we use digital signatures?
Digital signature ensures the integrity of data or information. It can detects any change of the data or information by verifying the data or information with its signature.
When do we use digital signatures?
Every incoming or outgoing request between two parties that contain financial transactions or financial information must contain a digital signature. And the content and its signature must be validated before processing the request.
Technical Specifications
Algorithm: RSA
Key Size: 2048 bit
Mode: PSS or PKCS
RequestBody should be canonicalized according to the following rules:
All new line “\n” should be stripped
Request JSON body example:
{
  "client_number": "123456",
  "product_code": "5k-xl"
}
Request JSON body after canonicalization has been performed:
{ "client_number": "123456", "product_code": "5k-xl" }
RSA are using Pair of Key Public and Private Key. Private key will be used to sign the message and create the signature. While a public key will be used to verify the signature. If the message was tampered, the signature will be invalid so the server should reject the request.

Private key and Public key
Digital Signature will use a Pair of Private Key and Public Key. To generate it we can use OpenSSL (https://www.openssl.org/).
Private key:
Generate 2048 Bit RSA key:
openssl genrsa -des3 -out private.pem 2048
Export the RSA private key:
openssl rsa -in private.pem -out private_unencrypted.pem -outform PEM
After exporting the Private Key, please make sure the private_unencrypted.pem’s content starts with -----BEGIN RSA PRIVATE KEY-----
Example:
-----BEGIN RSA PRIVATE KEY-----
MIIEowIBAAKCAQEAlBfXCXYvloc4aWB/2XJNn5z0mEZH3mfsyhMwV74DUQZJ0F4z
NFDDRGhtr3MGvIeg9yi7+facR0W0ZoIpfEsGqZh2KMgWA99qz5wAjD03LLuUHxQN
jVK0YuwFbP488+YHExpBXt2UdAwUyfZUWP8wfllAZPYkI1dchVqVyYV36yUf8pgJ
4leOZQZiZ/l2QEj97HWuRJRRQ9orZt/Wgd14zb2GCHHSulSw51qDAUHsQsll5YDO
syMuEJBT4tvoHQ8nLjQ0Y4tUjjDxlvxHJoxBhcjjRcVKPcxdsVxNxbWdXofNO2/s
HKWMQBC/6t7KrJ6GoXSgokZLEAruTvVGDu6slQIDAQABAoIBAFmZTuYPll0pdKz0
0IVcDbDLQoU6yFK8Z9we3fnIIbOM7W3fAHXfgzTJRcuH+YRpPq8q+wgR9517g9kd
WUI1FlPXxW2JGSDAtJvlU8OFafNrjgN7m3NsnWzYRbQa4f/ipVceZHyj7SSFBrLm
kUPDKbDYCQjMjzK+sWCRXNyvHs2qHdgsHi4eIQ/JhUz7Ht2yyA34shGwT+9fO6Be
tRLJRCBGxfJIDwmegH40lC6HFbUSC7Jmc5pSko4Bbq5nnfa7vNBeSSr0VpZTMBxo
oSLUaG8/fSj7JwOWsDW6UaK79eS60OSbWlPafkJSgK9VIAOEeV4ttPmIAGLn178Y
kvKyRyUCgYEAxUJVYEMK6SHuYOP4XuHedWBlniDMO210gq/nr0Nb3Fpxpwm1d8io
YTTjWFARuEEDj8XSwUIFpPJrtDObTp5gqkClZA9hQ7Wsol0QjrhFYj/kMcJ7axuM
iDMBpKIsoVKaHvoAKnfqaP+wqLJ4rQw7lva4HcaCiLpc11yU5ueNKycCgYEAwDFu
tjyFoMM3RftXIsPxuV8aO0P9YNe9Kw0e193pMnQKHKVuh1Bj9Fkv11cYTOAuniNV
TcLj3/o9Tu+w6Vt/G5+4PZgbhCUmAw6bX9PbdNsEBfpd+63MZWO82/F+ozCqtisY
lwR3djJ4TvCD7CDMvKHC920NOethqxTMrs3I7+MCgYA4MEj5fp9hARVR7B4XiOdB
MBBCFr2WP/tsLockWV+VSP4Owqk6UaIE7nfD9CrX/Uzyazs5aYEKFzOuxPR8VIjc
dkWmVusxylI+fZv1y2+YKPLraaaWP+ar9TuGldt4qHrWUAg0EKxo9ExyAUR2poFi
4yxW7vDH2a4QeoK/sz13CQKBgByavtmMpG7K3z0hLVTVSPLH/sV3VwzEzzjLGR4T
vxNtRdwBmzO0eUvywjYQlmNKsmWC6L1MFlJNkjZfYjs5DO/1k5xHOUEvrjqiP+nB
RFZeCnlBTB+bPGKSt5ccmDZ9lcrLGzvOxGDpHhLRpTDNqOsiQDxHFMLcD4tA6z3R
Duj1AoGBAJ930p4y+nlf4Nj12yEBwggMojQ870Ja/1AikSiOvaEQCuEAyBwr/slG
4AF9J3LDZjp5xfG2lz+RR+3n9jDqog3q+eWrZPBWySdpHYyGAP78yE66/5Q8a5j6
o1do+zNU8GkaTO9FGyAKQI5guAeaFF4KpIOn88zFT0E99lZeAz0I
-----END RSA PRIVATE KEY-----
Public key:
Export the RSA private key:
openssl rsa -in private.pem -outform PEM -pubout -out public.pem
After exporting the Public Key, please make sure the public.pem content starts with:
-----BEGIN PUBLIC KEY-----
Example:
-----BEGIN PUBLIC KEY-----
MIIBIjANBgkqhkiG9w0BAQEFAAOCAQ8AMIIBCgKCAQEAlBfXCXYvloc4aWB/2XJN
n5z0mEZH3mfsyhMwV74DUQZJ0F4zNFDDRGhtr3MGvIeg9yi7+facR0W0ZoIpfEsG
qZh2KMgWA99qz5wAjD03LLuUHxQNjVK0YuwFbP488+YHExpBXt2UdAwUyfZUWP8w
fllAZPYkI1dchVqVyYV36yUf8pgJ4leOZQZiZ/l2QEj97HWuRJRRQ9orZt/Wgd14
zb2GCHHSulSw51qDAUHsQsll5YDOsyMuEJBT4tvoHQ8nLjQ0Y4tUjjDxlvxHJoxB
hcjjRcVKPcxdsVxNxbWdXofNO2/sHKWMQBC/6t7KrJ6GoXSgokZLEAruTvVGDu6s
lQIDAQAB
-----END PUBLIC KEY-----
Delete private.pem permanently
After you have generated the public key, please put the information on your developer console (Public Key Section) both on testing app and live app, so that system can verify your signature. You must differentiate the public key for testing and production purposes. DO NOT use the above example for testing or live apps!
How to generate Digital Signature at the checkout request
These are the steps you need to follow to generate signatures during the checkout process. This is done to ensure that if any bot, machine, or person attempts to modify the request, we will be alerted. Additionally, if the request changes during transmission, it will be rejected. To create your signature, you can use this link (https://github.com/tokopedia/cryptography-example) as a guide.
The step to generate signature are:
First you need the private key and public key. See section 2.4.2 for detail. And please make sure you share the public key into Tokpedia’s dev console.
Then you need to include/import a private key to your code.
Example in golang:
func ParseRsaPrivateKeyFromPemStr(privPEM string) (*rsa.PrivateKey, error) {
    block, _ := pem.Decode([]byte(privPEM))
    if block == nil {
            return nil, errors.New("failed to parse PEM block containing the key")
    }

    priv, err := x509.ParsePKCS1PrivateKey(block.Bytes)
    if err != nil {
            return nil, err
    }

    return priv, nil
}
Sign the request payload with PSS or PKCS mode (depending on your config in developer console). with the private key with the function provided by your cryptography library. Note: please make sure the payload that you sign is the payload that is already serialized and will be on your request body.
Example in golang:
func SignPSS(privKey *rsa.PrivateKey,msg string)string{
rng := rand.Reader
message := []byte(msg)
hashed := sha256.Sum256(message)

signature, err := rsa.SignPSS(rng, privKey, crypto.SHA256, hashed[:], nil)
if err != nil {
    fmt.Fprintf(os.Stderr, "Error from signing: %s\n", err)
    return ""
}

sEnc := base64.StdEncoding.EncodeToString(signature)
return sEnc
}
Example in Java:
public static String Sign(PrivateKey privateKey,String msg) {
try {
    Signature signature = Signature.getInstance("SHA256withRSA", "BC");
    signature.initSign(privateKey);

    byte[] message = msg.getBytes();
    signature.update(message);

    byte[] sigBytes = signature.sign();

    byte[] sig64 = Base64.getEncoder().encode(sigBytes);
    return new String(sig64);
}catch(Exception ex) {
System.out.println(ex.toString());
}
return "";
}
Example in PHP:
<?php
require __DIR__ . '/vendor/autoload.php';

use phpseclib3\Crypt\RSA;
$privKey = file_get_contents('./key/priv.pem');
$pubKey = file_get_contents('./key/pub.pem');
$priv = RSA::loadPrivateKey($privKey); // private key

$plaintext = 'test';
$signature = $priv->sign($plaintext);
$base64sign = base64_encode($signature);

echo $base64sign;

$pub = RSA::loadPublicKey($pubKey);
$verify = $pub->verify($plaintext, $signature);

echo "\n";
echo $verify ? 'verified' : 'unverified';
?>
Example in Python:
from Crypto.Signature import pss
from Crypto.Hash import SHA256
from Crypto.PublicKey import RSA
from Crypto import Random
import base64

message = 'To be signed'
key = RSA.import_key(open('signature/priv.pem').read())
h = SHA256.new(message.encode('utf-8'))
data = pss.new(key).sign(h)
# print(signature)
encodedBytes = base64.b64encode(data)
encodedStr = str(encodedBytes, "utf-8")

print(encodedStr)
Attach the signature at the checkout request header. (endpoint: /v2/order)
Example:
curl -X POST
'https://b2b-playground.tokopedia.com/api/v2/order'
-H 'Authorization: Bearer c:Y2xpZW50X2lkOmNsaWVudF9zZWNyZXQK'
-H 'Signature: PTke/eqvau1h5Saw16SJTCXKs0Cjw2WuKvz8T10/k4BcxfaZAqgyFDS5vgb0GR9X4AAv2t6onnQOaGHnzwyHUHHMpA1DFi8TUmykxkSBfZTmAxAhcUfu9tqo8LcJjDRHg4frdNTwAzDiS8m35t7Lt/eimuPbos6yQNDRBWuNzbMU4wkOI9ziIwjFvNBJD+xutcRjaqtr8XxCpAQtii+Nq1vd3B+ubbMZp4MmaZiU5tMWtpRusOqRNs3THL0qQtGC1cv4rrCEyvl40K3vIbutnkTsusaSN+85lXmJSUPyRTDSBZBKo9sIEj7uPqEWhlSGuvWMznAjhzNEE/xGmVHnqg=='
-H 'Content-Type: application/json'
-H 'Accept: application/json'
Verify SATRIAN Signature from Callback
To verify the message that we sent, you need our public key. Please ask our TechOps to how to get our public key.
And to verify the message the steps are:
Include / parse our PublicKey.
Example in Golang:
func ParseRsaPublicKeyFromPemStr(pubPEM string) (*rsa.PublicKey, error) {
    block, _ := pem.Decode([]byte(pubPEM))
    if block == nil {
            return nil, errors.New("failed to parse PEM block")
    }

    pub, err := x509.ParsePKIXPublicKey(block.Bytes)
    if err != nil {
            return nil, err
    }

    switch pub := pub.(type) {
    case *rsa.PublicKey:
            return pub, nil
    default:
            break // fall through
    }
    return nil, errors.New("Key type is not RSA")
}
Get the request body. (Make sure you get our request body before you deserialize it).
Get the signature from our request header.
Verify the message using the signature.
Example in Golang using PSS mode:
func VerifyPSS(pubKey *rsa.PublicKey,msg string, base64Signature string) bool{
    message := []byte(msg)
    bSignature,err := base64.StdEncoding.DecodeString(base64Signature)

    if err!=nil{
    fmt.Println("Failed to decode signature")
    return false
    }
    hashed := sha256.Sum256(message)

    errVer := rsa.VerifyPSS(pubKey,crypto.SHA256,hashed[:],bSignature,nil)
    if errVer!=nil{
    fmt.Fprintf(os.Stderr,"Error from verification %s\n",errVer)
    return false
    }
    return true
}
Date Header
The "Date" header field represents the date and time at which the message was originated, having the same semantics as the Origination Date. We recommend adding this header to all requests.
For example:
Date: Tue, 15 Nov 1994 08:12:31 GMT